If you ever need to correct not all, but only part of a photo, then you probably want the resulting image to look as natural as possible. After all, if the edited area is highlighted in the photo, it will look at least strange. In addition, the best photo editing is the one in which the editor’s interference is least noticeable. This is a sign of professionalism.
Graduated filter
In such cases, you should always use another smart tool from Adobe Lightroom – lightroom graduated filter . Basically, it allows you to adjust all the usual parameters – brightness, saturation, contrast, etc. – but only for a specific area of the photo. This tool allows you to create great shots. Moreover, the usage of gradient filter is really easy.
When is it worth using a graduated filter?
For many newbies, those who are just starting to work with Adobe Lightroom, some of the footage may seem hopelessly spoiled. But this is not the case, many shortcomings can be corrected with the lightroom gradient tool:
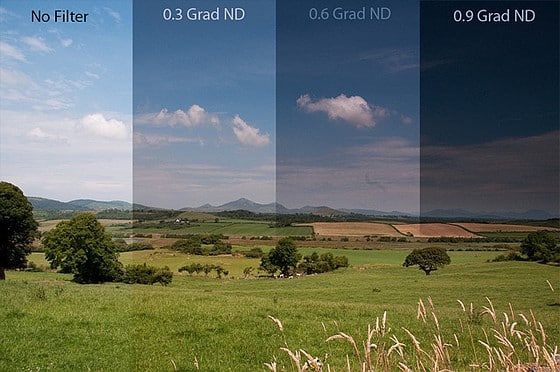
- If you want to get a darker sky, then making it that way without affecting the horizon can be very difficult. In this situation, it is best to use a gradient tool because it allows you to make very subtle changes;
- The gradient going from an area located slightly above the horizon to an area located slightly below will be almost invisible to an unprepared viewer. This produces a much more natural image than most other local adjustments;
If you need to focus on the horizon line where the colors practically merge – for example, at the sea, then a graduated filter is perfect for this, it will help to emphasize the border of sky and water; - In case of uneven lighting on a cloudy day, just such a tool will help to correct the image, making it better.
Of course, the gradient lightroom is not a panacea and does not guarantee perfect results. Sometimes increasing the brightness of one part of the frame using a graduated filter can lead to loss of naturalness of the whole frame – it looks artificial. But most of the different imperfections you can improve using graduated filter in lightroom.
How to work with a filter
If you want to know how to use graduated filter in lightroom – it’s not complicated at all, you can use a simple tutorial. In most cases, this tool works really well. So be sure to try using it. It is the most powerful local editing tool in Lightroom. Even if not everything works out the first time, it is worth trying further, everything is quite simple.
If you want to see the exact area to which your adjustments will be applied, here’s a handy tip: press the O key. The gradient area in the image will be highlighted in red. This can be useful if your gradient works well on most of the photo, but there is a small area that you don’t want to edit.
Radial filter
Along with the Graduated Filter, newer versions of Lightroom offer a so-called Radial Filter. It’s also a great new photo editing tool with more advanced features.
In this case, your “gradient” will have a round or oval shape, but in all other respects its operation is identical to the lightroom graduated filter presets. Try to use it by all means – interesting effects are guaranteed.