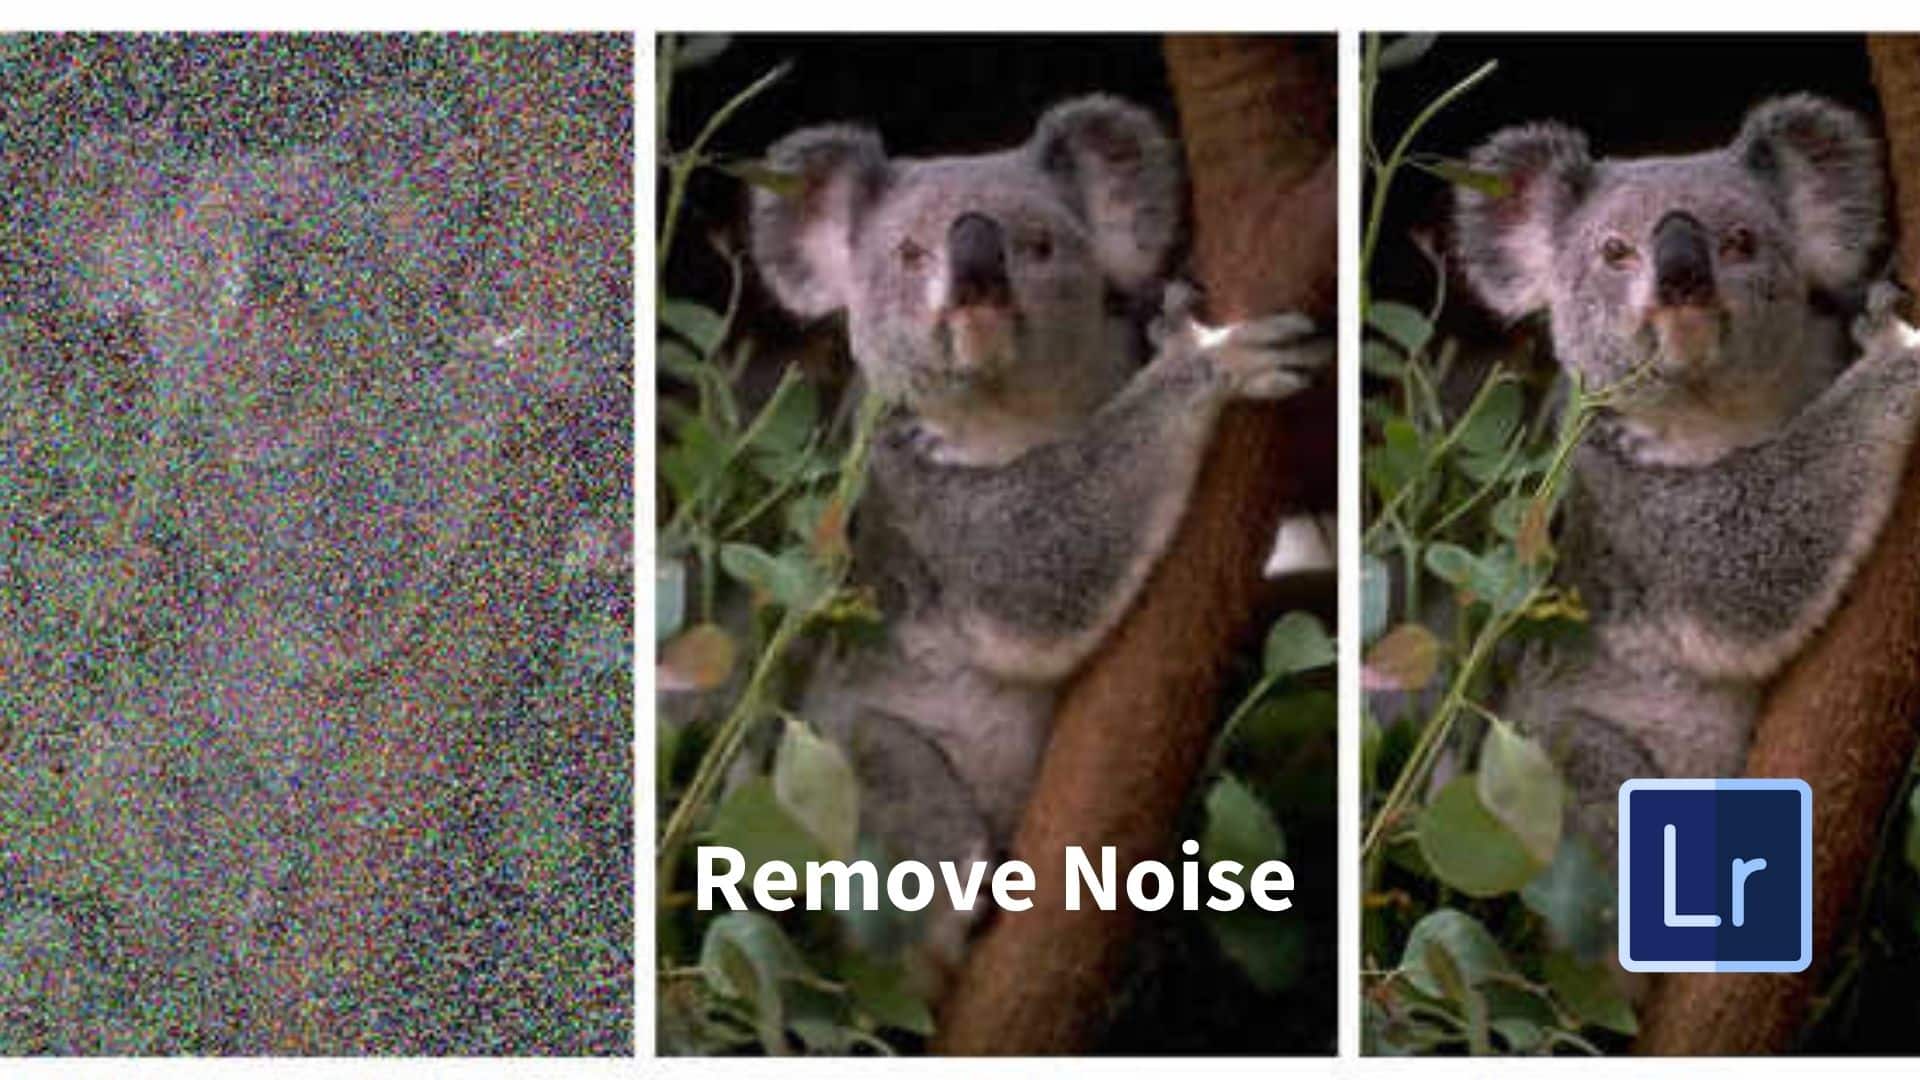
Sometimes, in order to significantly improve the quality of a photo, you need to remove the noise from it. Of course, noise is not often used for the actual image – more often it is associated with sound. But formally, these are any distortions. In the field of photography, the word noise refers to the graininess and false colors in the image, which can lead to poor quality photos with inconsistencies in the original parameters.
In a camera, this noise appears to be something like grains of sand, which themselves increase in size, color variations, and become more and more erratic as the noise increases. In most cases, good cameras can attenuate noise quite satisfactorily, and cameras with full-frame sensors do the job best.
The amount of noise on specific frames depends on the ISO value as well as the shutter speed. The reason for this can be called the ratio of the signal level to interference. As soon as we begin to amplify the signal, the probability of errors in its transmission also increases – that very noise.
Of course, the manufacturers of each camera try to provide it with technologies to reduce noise. It can be various settings of photosensitive sensors, an appropriate digital processor, innovative software, as well as the ability of the photographer himself to set individual parameters. But in order to successfully use all modern means of noise reduction, you need to know what creates it.
Noise reduction
Removing noise function is designed to qualitatively clean up the signal that the camera receives, using certain procedures that try to eliminate various types of noise or interference that are expressed as noise in photographs. Unfortunately, even professionals admit that overuse of the noise reduction function can lead to a loss in image quality. Therefore, it is worth choosing the most optimal values that do not degrade the quality of the photo.
In the case of post-processing, denoise can also help to strike an optimal balance between camera settings and parameters, user’s personal settings and the capabilities of modern software.
Noise reduction in Lightroom
So – how to make a photo less grainy in Lightroom? All the necessary tools for sharpening and noise reduction can be found in the separate Develop menu in Adobe Photoshop Lightroom, specifically in the Details section. The Noise Reduction tool comes in two parts – Luminance and Color. Each of the parts has its own set of small sliders, which are used to adjust – you can find more in the tutorial.
The Luminance slider is responsible for the graininess, and the Color slider for the color of the noise. When working with adjustments, it is worth considering that the first of them will be aimed at softening the graininess, but the second will adjust the quality of elements that are not included in the frame. As the software delimits the areas of noise reduction, you can understand what type of noise prevails in your photo. And it is the best way to reduce noise in photoshop.
Noise Reduction Luminance
The main thing that Noise Reduction does is to correct everything that has to do with brightness, in particular, the actual brightness, contrast and detail. Their task is to improve three important parameters:
- The first element, Luminance, deals directly with the graininess of the noise. However, it is important not to overdo it here – as the slider advances, along with the graininess, important details such as hair or fabric texture will also go away;
- The effect of the second Details tool changes the brightness level of the image, which will help bring back some of the lost details in the image that may have gone after using the first tool;
- The last tool, Contrast, adjusts the contrasts of each pixel in the image. It differs from the main standard Contrast in the smaller size of the corrected elements, so its work can be almost imperceptible.
Noise Reduction Color
Your next action is a section with sliders that control color noise reduction. These include: Color, Detail and Smoothness. They control three aspects of color noise:
The “Color” slider works with color unevenness in the frame, creating a uniform background, however, even here you need to strictly follow the process – if you move the slider a little further than necessary, all similar colors will successfully merge into one;
The Detail slider is very similar in its functions to the same tool in the Brightness menu, it also adjusts the level;
The Smoothness tool is able to effectively determine the quality of the transition between colors whose parameters have been adjusted, while its work is also subtle and not conspicuous, but no less important for this..
Other Noise Reduction Tools
When you need to apply the reducing noise in photoshop function selectively, i.e. not to all parts of the image. Three tools in LightRoom Photoshop allow you to do this: Radial Filter, Gradient Filter, and finally Adjustment Brush. When using these tools, it is important to keep in mind that all of these sliders correct only the area of the image to which they were applied, without going beyond its borders.
Selective application of noise reduction is especially useful in cases where a global change would result in loss of image quality, and pay more attention when you want more control over how the effect is applied. For example, with increasing brightness, shadows tend to be a little trickier to work with, as they create more imperfections than brighter areas. In order to improve exactly the areas of the shadows, you can use the tools below.
Sharpening and Noise Reduction
Strong noise can appear for various reasons – it can be an old device, an incorrectly high ISO value, difficult shooting weather conditions, and much more. Most often, as a result, instead of the expected frame, we get a blurry image and fuzzy details. To correct these shortcomings, it is worth applying Sharpening.
However, you need to be very careful here, because even a slight change in the position of the slider can lead to quite noticeable changes in the image. And in the end, instead of getting rid of the noise – we just add it. Here, the developers also provided one small helper – the Masking slider, which can help restore sharpness.
What’s great about using a sharpening mask tool is the ability to set higher noise reduction values. This setting is suitable for processing skin, walls, sky and some more flat surfaces.
Noise reduction presets
The best option is to create presets in Lightroom as in Iuliia Store, taking into account the cameras used and ISO values for further reuse. In general, presets are the key to significant time savings. By creating presets for your own camera, you can reduce the time for processing photos to a minimum, because all the parameters will be already set.
Of course, it is worth experimenting more with the camera – given its own parameters, you can additionally use other tools offered in Lightroom.
And although you can try to remove noise that begins already directly during the shooting by camera’s parameters, it is important to be able to get rid of noise during post-processing. Your camera will do its best, and Lightroom will improve the result.